The ultimate guide: How to set up a pedalboard
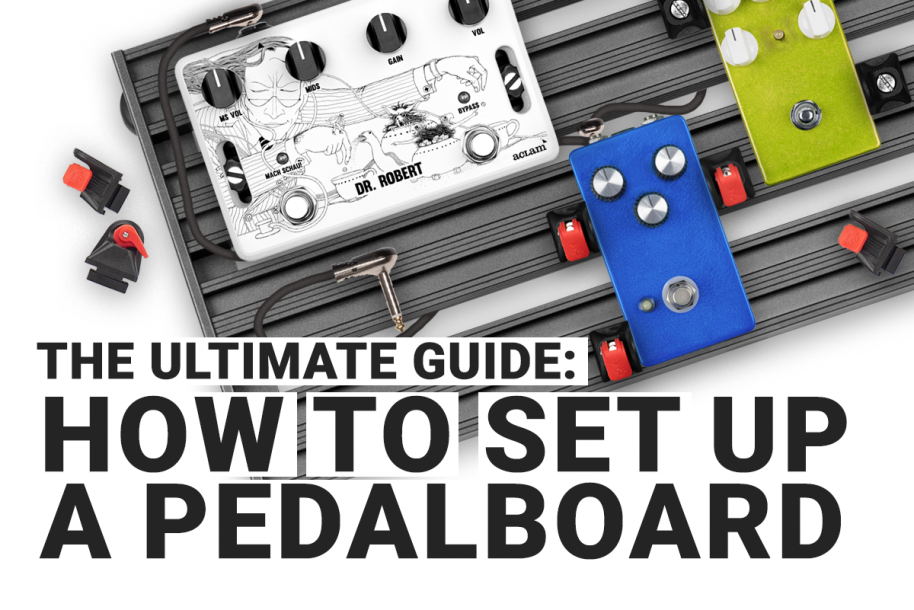
Whether you're a guitarist or bassist looking to build your pedalboard, this comprehensive guide is your roadmap to build a professional setup. Whether you're a beginner navigating the vast world of effects or a seasoned player seeking to elevate your rig, avoid the pitfalls that can compromise the reliability of your pedalboard.
3 important reasons to build your pedalboard like a pro:
✅ Portability and organization to move from place to place.
✅ Time-saving efficiency during setup.
✅ Consistent tone for a reliable sonic experience.
Table of Contents:
- 1. Select the perfect pedalboard
- 2. Choose a Pedal Power Supply
- 3. Invest in Quality Cables
- 4. Craft the perfect layout and pedal order
1. Select the Perfect Pedalboard
The first step in setting up a pedalboard is gathering all necessary gear. There’s plenty of pedalboard companies in the market, and you can even build your own pedalboard at home.When choosing the right pedalboard for you, consider the following factors:
1.1 Pedalboard Size
Ensure it accommodates all your pedals and patch cables comfortably. Consider factors like your current pedal collection, potential future additions, and where you plan to play (on the go or stationary).
• Small pedalboards offer portability but limited capacity.
• Medium-Sized pedalboards strike a balance between capacity and comfort.
• Big pedalboards offer you more capacity but less comfort. A great solution if you’ll keep it home, at the studio, or you have someone to carry it for you.
• Modular pedalboards can be adapted to your needs over time.
Pro Tip: Check our article, "The Secret to Choose Your Pedalboard Size," for more insights.
1.2 Material & weight
Look for a board that is made of strong, durable materials, designed to withstand the rigors of regular use. Additionally, weight is an important factor to consider, especially if you’ll be transporting your board often.
So: look for a board that is lightweight and easy to carry, while still being strong and durable enough to last. Aluminium and wood are great materials that will give you a good relation between weight and resistance. Especially if it is constructed with aluminium profiles that will give you sturdiness.
1.3 Design and construction
Slotted pedalboards are the old & most-common option, but there are many other designs that can help keep your board organized and easy to use.
Angled pedalboards are a great option as they make it easier to reach the last row of pedals, and also provide a secure space for the power supply under the pedalboard and a clean way to route the audio cables. You’ll also have more space for pedals in your pedalboard!
We strongly recommend a board with adjustable and anti-slip feet so it stays in place when you step on it. With the right design and construction, your pedalboard can be a reliable and convenient part of your setup!
1.4 Attaching method
When it comes to attaching your effects pedals to your pedalboard, there are several options. Hook and loop, plates, zip ties, adhesive strips, bikechains… all of this options are effective ways to keep your pedals in place. However, if you want to ensure your pedals stay pristine and in perfect condition, we recommend looking into adhesive-free alternatives such as our patented Smart Track® Pedalboard System.
Smart Track pedalboards securely hold your pedals in place without the need for glue, tape, or other messy substances. In addition, the system is designed to keep your pedals safe from wear and tear, ensuring that they retain their value for years to come.
1.5 Accessories & Customization
Your pedalboard will evolve with you, so you must be sure you can addapt it to any need you will have in a future. Check if the manufacturer is offering you accessories to help customize your board, such as brackets to attach the power supply, cable management clips to keep it tidy, and extra levels for adding more pedals... The more options you have, the more adaptable and custom will be your pedalboard! Also consider if the board has any extra features such as built-in power supplies, carry handles, or whatever you can imagine.
2. Choose your Pedal Power Supply
Powering up your pedals is often overlooked, but it’s a critical part of ensuring that your pedalboard is functioning properly:
⚠️ A mismatched powering to your effects can be the end of your effect pedal and/or your power supply. You wouldn’t be the first one to kill a pedal when powering with the wrong voltage or polarity, so carefully check the power requirements of all of your Pedals.
2.1 First Step: Check your power requirements
Understand each pedal's specific power needs, considering voltage, current draw, connector polarity, and AC/DC requirements.
Refresh your memory on concepts:
Voltage (V)
Voltage measures the electric potential of to points of a circuit. To keep it simple, it’s the pressure that pushes the electricity of the power supply, and it is measured in Volts.
The most common voltage required for pedals is 9V, but some run on 12V, 15V, 18V, or even 24V.
⚠️If you power a pedal with a higher voltage, you can blow some components or totally ruin its circuit. Ensure the power supply matches the required voltage for each pedal.
Current (A)
Current is the rate at which electricity flows in a circuit and is measured in Amperes. Since the power consumption of pedals is relatively low, the ampere (A) is a large unit of measure, and therefore, the current draw of a pedal is typically specified using a fraction of that unit, known as milliamperes (mA):
1 A = 1000 mA so 0.015 A = 15 mA
This is important to know, since some power supplies indicate their max current in Amps instead of mA.
The power supply must be able to handle at least the current draw needed for each pedal, as each pedal will draw only the amount of current that needs to work properly.
For example: The Dr. Robert effect pedal needs approx. 40 mA so you could power it with a T-Rex Fuel tank as all of its isolated outputs are 120mA each.
Keep in mind that digital effect pedals require more current than analog pedals, so be sure to check the power requirements for each effect and make sure your power supply is capable of delivering it.
Connector polarity
Connector polarity describes the direction of the current flow of the electrical circuit and indicates the way the positive and negative terminals of your pedal are wired. It is usually indicated by this drawing:
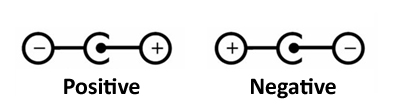
The most common polarity in effect Pedals is center negative. Even though, some pedals using vintage components like germanium transistors have reverse polarity (center positive) to alert you that circuit has a positive ground and must be powered using an isolated power supply.
⚠️ Make sure to double check the polarity before connecting your pedal to the power supply.
AC or DC Current
Electrons can flow in a conductor in two Fashions:
AC or Alternating Current: Mostly used to transmit electricity in power lines and deliver current to homes, industry etc.
DC or Direct Current: The type of current that many electric and electronic devices such appliances, computers, amps and pedals work with.
The function of an effect power supply is to transform that relatively high AC voltage (110 to 240V) into a low DC voltage, isolating that source of voltage from the wall outlet avoiding electrical shocks for the player. While most effect pedals work on DC, some of them require to be powered with AC mostly because they have tubes (tube filaments normal run on AC) or they need dual rail (positive and negative voltages) to work properly.
Pedals like old EHX Tube line or Digitech’s Whammy 4 need to be powered with AC and while it’s not a risk powering them with DC (they will not work though)
⚠️There’s a potential risk to harm a DC pedal powering it with AC.
Before using an unknown power adaptor make sure to check its specifications. Here’s what you need to know to identify a compatible power supply for any given pedal.
[Fotos d'exemple]
2.2 Summarize it
Create a template to record each pedal's voltage, current draw, plug type, and AC/DC requirements. This will help you make an informed decision when it comes time to choose a power supply.
| Effect Pedal | Voltage (V) | Current Draw (mA) | Plug Type | AC / DC |
| Dr. Robert | 9 | ≈40 | Center Negative | DC |
| Pedal 2 | ||||
| Pedal 3 | ||||
| ... |
2.3 Match a Power Supply with your pedalboard needs
Select a power supply unit that meets the collective power requirements of your pedalboard. Opt for reputable brands and consider isolated multiple power supplies for reduced noise and enhanced reliability.
There are many well known brands that manufacture Power Supplies. We recommend go for one of these well-known brands as poorly designed power supplies can lead to noise, ground loops and intermitent issues.
There are two different architechtures for multiple output power supplies:
• Common ground multiple PSU: Simply by having 4, 8, 10 or even 54 separate power connectors doesn’t mean that a PSU has the mentioned individual power outputs. Cheap PSU’s are “glorified” daisy chained power adaptors that share the same power transformer and ground point. Some even provide multiple voltages per output but they’re a potential source of noise, ground loops (usually caused when two pedals that draw a lot of current share the same power supply) and can be more prone to fail since their internal transformer runs closer to its limits.
• Isolated multiple power supplie: The authentic multiple power supplies are the ones that have an individual power adaptor per output, with a single power transformer (or secondary if they share the transformer’s primary winding), AC to DC recitifer, voltage regulation and filtering. Those are the best option since they eliminate the famous ground loops and other power related noises. The bad side is that they have a higher number of components and that makes them more expensive. Anyway it’s definitely worth it since a good power supply and the first building block of a reliable pedalboard.
Keep in mind that your power supply also has to be in your pedalboard. We recommend to hold it underneath, so you will have more space for effect pedals.
Leave a Reply