Design and build your custom pedalboard step by step
Tired of buying standard pedalboards that does'nt meet your needs? If you are thinking about building your own custom pedalboard, you need to keep reading. Aclam’s modular pedalboards will allow you to combine the pedalboard parts you need to build a custom pedalboard.
How to build a custom pedalboard?
1. Define the aproximate pedalboard dimensions you need.
2. Select the side length you need
3. Select which tracks you need.
4. Decide if you want a completely flat or a slanted pedalboard.
5. Decide the fasteners to attach your pedals.
Basics: Understanding how Aclam’s pedalboard works
In order to design your custom pedalboard, you will need:

- 2 pedalboard sides: With the desired length
- Several Tracks: Depending on the size and configuration for your custom pedalboard.
- 4 Feet: Adjustable or not, depending if you want a flat or slanted pedalboard.
- Pedal attaching system: Choose between using Standard fasteners, Fast Fasteners or 360º Fasteners.
We will take care of the smart nuts, screws and allen keys so you can build your custom pedalboard easily!

Step 1. Define the pedalboard dimensions you need
First of all, start defining your perfect pedalboard dimension. It is not always easy choosing the right size and there are some questions we strongly recommend you ask yourself before deciding. You can read about the secrets to choose your right pedalboard size here.
Take a look at all the pedalboard sizes possibilities. The pedalboards highlighted in green are Aclam's standard pedalboards, which you can buy directly at our online store without the need of thinking much more about it. The pedalboards showed in grey, are the ones you can build yourself as a custom and modular pedalboard.
Aclam pedalboard's dimensions summary
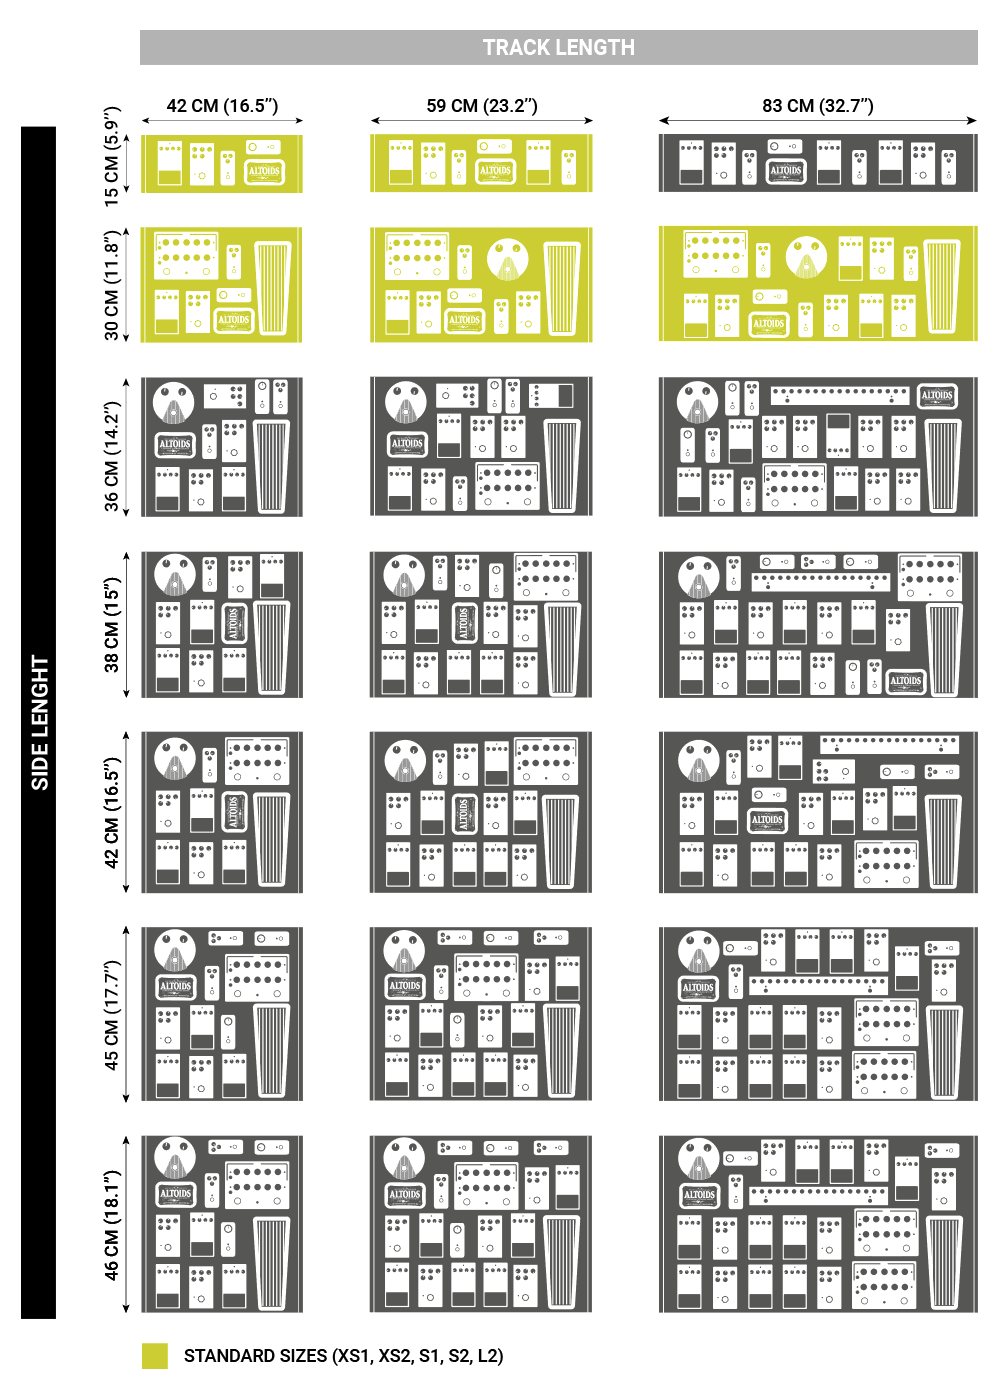
Tip: Choose the approximate dimensions and keep in mind that combinations may vary if you are looking to build a free routing or top routing pedalboard. You will see that in the next step, while choosing the pedalboard sides.Step 2. Define the side length you need
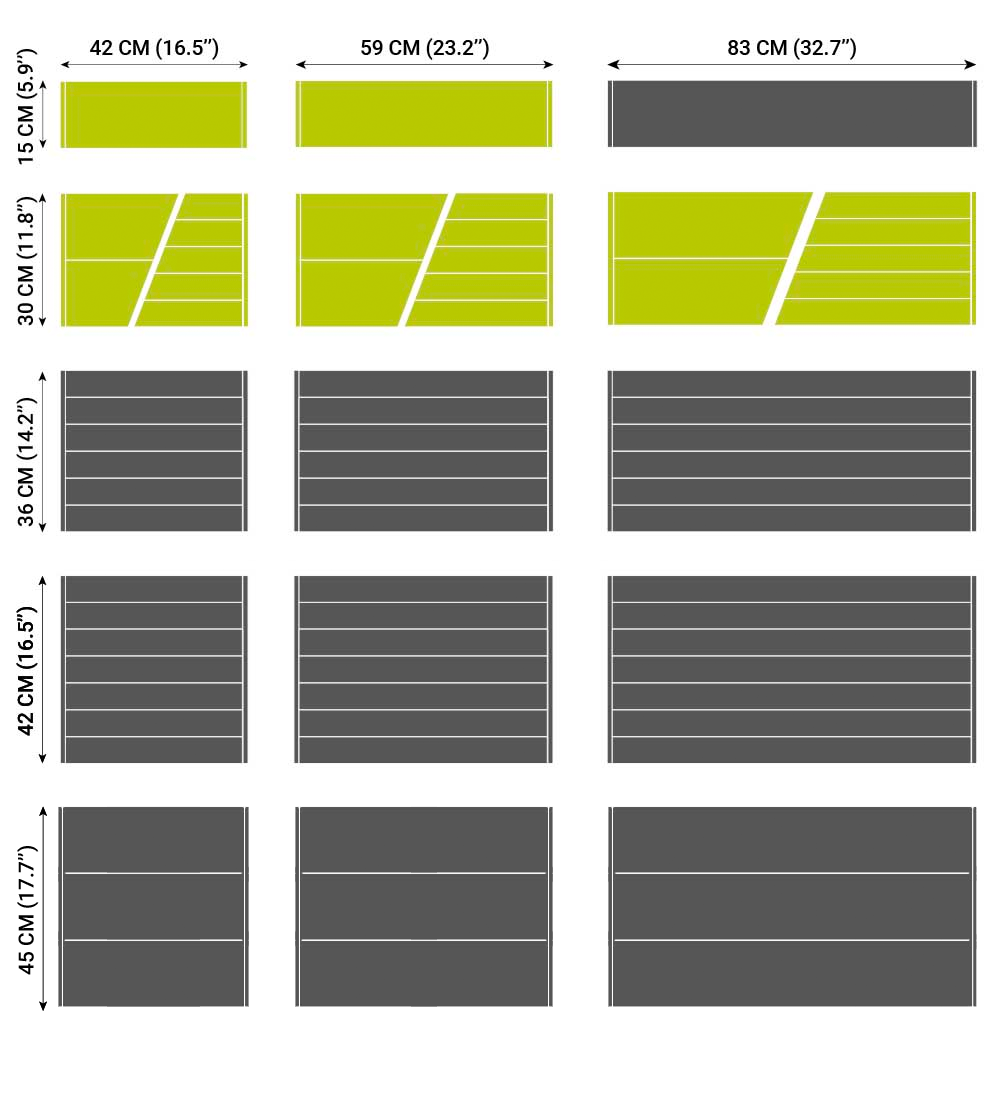
You will always need 2 sides to build one pedalboard, and you can choose how would you like to do the cable routing in your pedalboard: top routing or free routing.

Top routing - Pedalboard dimensions
On top routing pedalboards, cables are laid throughout the top side of your pedalboard. Remember you can use the grooves and tidy cables to keep them organized.
Top routing - Sides lengths
Choose your pedalboard sides here
Free routing - Pedalboard dimensions
If you prefer having a 2cm distance between slats to organize cables freely through the pedalboard, this is your choice.

Free routing - Sides lengths

Choose your pedalboard sides here
Step 3. Check which tracks length, model and quantity you need.
Be sure to know which sides you have chosen and check carefully which tracks and how many of them do you need to complete your pedalboard.
Track model
There are 2 different track widths available: 6 cm or 15 cm.


Choose your pedalboard tracks here
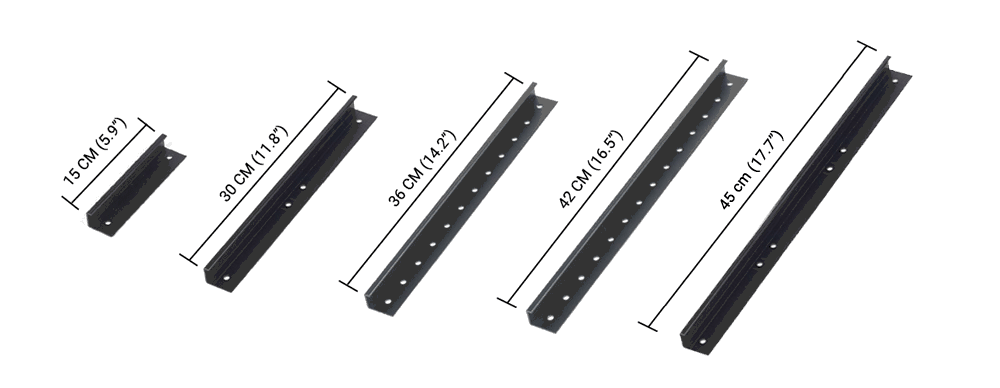
Track length
All Aclam's pedalboard tracks are available in 3 different lengths: 42, 59 and 83 cm.

Choose your pedalboard tracks here
Tracks models and quantity for Top Routing pedalboards
As you can see in the sizes summary for top routing pedalboards, here you have the model and number of tracks that you need to build:
Pedalboard side length | Track width | Quantity |
| 15 cm | 15 cm | 1 |
| 30 cm | 15 cm | 2 |
| 30 cm | 6 cm | 5 |
| 36 cm | 6 cm | 6 |
| 42 cm | 6 cm | 7 |
| 45 cm | 15 cm | 3 |
Choose your pedalboard tracks here
Tracks models and quantity for Free Routing pedalboards
As you can see in the sizes summary for free routing pedalboards, here you have the model and number of tracks that you need to build:
Pedalboard side length | Track width | Quantity |
| 30 cm | 6 cm | 4 |
| 38 cm | 6 cm | 5 |
| 46 cm | 6 cm | 6 |
Choose your pedalboard tracks here
Step 4. Decide if you want a completely flat or a slanted and adjustable pedalboard.
If you wish to have a completely flat pedalboard, add 4 x front rubber to your cart.

If you prefer a slanted pedalboard, add 2 x front rubber and 2 x adjustable foot.

Step 5. Define the fasteners to attach your pedals
Aclam fasteners are reusable, enabling you to attach, detach, and rearrange your pedals as many times as you need. The anti-slip rubber surface in contact with your effect pedals will hold them in place without damaging them. Get rid of adhesives and sticky things under your effects!
Fast Fasteners
https://www.aclamguitars.com/store/fast-fastener.html
The quickest attaching method for your adhesive-less pedalboard
Standard Fasteners
The standardy way to attach effects pedals to a Smart Track® pedalboard.
360º Fasteners
Attach unusual & circular shaped effects pedals.
Make your order!
If you need any help or if any question arises regarding the proper combination just contact us and we will be happy to help you out!
Make your custom pedalboard now!
Share your custom and modular pedalboards on social media!
Tag @aclamguitars and use the hashtags: #myrigmyrules #aclamguitars
 |
|
|
|


If you enjoy this reading, help us to spread the word: share it and leave you comment below!
Aclam Team
Interesting...
I'm glad for this post ,it clears up some questions I had,namely the parts that aren't available in the U.S.,( still don't know the reason)but I was thinking I couldn't get the larger sized pieces,as I'm considering a big board.Ill keep on planning,and hopefully make an order,soon,but I'm thinking a phone call,to make sure I have things figured correctly before ordering,would be a good idea.Thanks!
How can I build a two layer pedal board? nnI have Boss router to go on the lower level, then the pedals to go on a upper level,. The upper level wwold be about 1/2 the depth of the lower level, and be over the 1/4 jacks on the Boss router.
Hello Paul, nHere's a blog entry that can help you out to decide which is the best option for you: https://www.aclamguitars.com/smartblog/71_two-tier-pedalboard.htmnHope it helps!
Looking to place my boss gt1000 and sy-1000 on one pedal board with a riser so one can go on top in the back of the other.